How to use resistance bands
One of the most overlooked training aids you’ll find among fitness enthusiasts, resistance bands are surprisingly powerful.
Being highly portable, space saving, resistance bands can be easily stored in your gym bag and used during your workouts. Whether you’re looking to increase full-body strength or ease your recovery time after an injury, their magic lies equally in their convenience and versatility.
If you’ve been interested in resistance bands, it’s helpful to understand which type is right for your routine. Plus, by adding some resistance band training to your repertoire, you can start experimenting with this flexible training tool the next time you hit the gym.
What are resistance bands used for?
Compared to other fitness equipment, resistance bands are shockingly affordable. A set on Amazon shouldn’t cost more than $25, although you can often get them for less.
However, the real shocker of the usefulness of resistance bands comes down to their versatility. These accessories can be used to level up any of the following types of procedures.
Strength training
The most common use of resistance bands is simple: increase strength. Resistance bands can be used to target different muscle groups, including:
- Lower body
- Core
- Upper body
Despite their innocent looks, sports science suggests that these workout accessories can be just as effective as dumbbells and other heavy gym equipment.
Another benefit of using bands for strength training is how gentle they are on the joints. If you’re working through an injury, new to exercise, or have a chronic joint condition like arthritis, they provide a gentler way to get more out of your workout without overtaxing your body.
Building flexibility
Many fitness enthusiasts tend to focus on building strength or muscle mass. But flexibility is also an important component of overall fitness, as it can reduce your risk of injury and improve your ability to move smoothly and functionally in everyday life (not just in the gym).
Resistance bands can be used to increase range of motion in:
- Yoga or Pilates – Many Pilates and yoga instructors use rubber bands to increase the effectiveness and results of these workouts. You may see resistance bands used during classic pilates squats or as support in yoga to promote better alignment.
- Auxiliary stretching – By wrapping a resistance band around an object—whether it’s a body part or a piece of furniture—you can deepen an existing stretch. For example, you can strengthen your hamstring stretch by lying on your back by wrapping a resistance band around the arch of your foot and pulling it toward you.
Recovery from injury
Physical therapists often use resistance bands in PT exercises to promote muscle rehabilitation. Because of their adaptability, they can be a great tool for anyone – whether you’re new to fitness or an athlete recovering from a serious injury.
You can see their use for improvement:
- Amplitude of motor exercises
- Poor reinforcement
- Muscle activation (this helps keep inert muscles active and prevent atrophy during recovery periods)
What types of resistance bands are there?
There are three main types of resistance bands:
- Mini groups or loops – These are thin, flat loops, usually made of latex. They tend to have low resistance, so they’re a great option if you’re new to training or just starting to use this piece of equipment.
Some loop tapes are made of fabric, which gives them more grip to reduce slipping. Fabric bands also tend to have a bit more resistance, making them a great option if you’ve been building strength for a while.
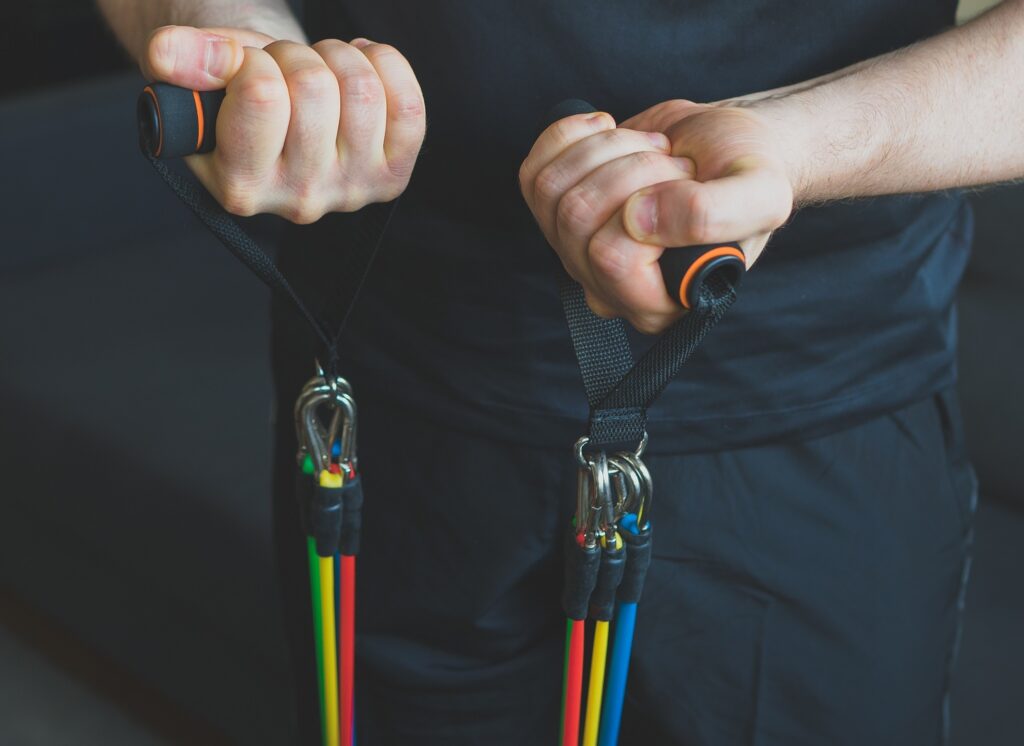
- Tubes with handles – Tubular ribbons look like jump ropes, but they are tied with a handle that you can grab onto. They are most often used to build arm strength, often by standing on a tube and doing biceps or other arm exercises.
- Therapeutic groups – Therapeutic bandages resemble a mixture of mini-bandages and tubes. They look like ribbon without a loop without handles – sort of like latex ribbon. You’ll hold each end of the band in your hand and use them for range-of-motion exercises, gentle strength building, or muscle activation.
How to use elastic bands and 5 exercises to try them
Before starting bands, your first step is to choose the right one for you. In addition to band style, you’ll notice that many kits consist of light, medium, and heavy options. They refer to the voltage of each group. In general, lighter bands are used to perform more repetitions; for lower reps, choose a heavier band.
Once you’ve chosen the type of resistance band you want, you can familiarize yourself with this tool with some of the following exercises.
#1 Squats with Mini Bands
Adding a mini band to your squats will activate your glutes, quads and hamstrings in one fell swoop.
Try 3 sets of 10-15 reps of the following:
- Tie a mini bandage above the knees.
- Place your feet shoulder-width apart, with your toes slightly turned out.
- Squat down, focusing on keeping your back and knees over your toes as you lower.
- Aim to maintain tension in the band as you squat, squeezing your knees.
- For an extra burn, squeeze your glutes while standing up.
#2 Sidewalks on mini bands
With a loop band in tow, even walking becomes a workout. These band moves work the outer glutes and thigh muscles.
Try 3 sets of 15 of the following steps:
- Tighten the mini band above your ankles or above your knees (same as a squat).
- Keep your feet hip-width apart, gently bend your knees, bending them slightly forward.
- Step with the lead leg to the side, increasing the tension on the band, then step with the other leg, returning the band to the original tension.
- Continue until you reach the desired number of steps. Then take a step to the other side with the other foot.
Biceps #3
Tube Bands specialize in arm exercises, and these curls are great for targeting your biceps.
Here’s how to do it:
- Stand with your feet shoulder-width apart and stand on the trumpet, holding the handles with your palms facing out.
- Pressing the elbows to the body, pull the handles to the chest, bending them at the elbows.
- Gradually bring the handles back down the sides. You can try 10 repetitions, up to three sets.
#4 Chest Press with Tubular Band
If the chest press is in order, you can use your handy band instead of the equipment.
Here’s how to train your chest, shoulders, and triceps press with a tubular band:
- Find a stable structure—such as a post or column—and wrap pipe tape around it.
- Take a handle in each hand and move away from the structure until you feel tension in the tape.
- Keep your hands at chest level, elbows bent. Keeping your palms down, extend the handles forward to full extension.
- Gradually bring your arms back to your chest. Repeat.
You can try 3 sets of 10-15 repetitions each.
#5 Seated rowing with therapeutic tape
If you want to strengthen your back without a mechanical rower, break out the therapy tape and follow these steps:
- While sitting on the floor, drape the therapeutic tape over the soles of your feet. Extend your legs long in front of you.
- Sit tall and hold each end of the band with your palms facing in. Bend your elbows and pull your shoulder blades toward the midline, pulling the band toward you.
- Gradually return your hands to the starting position.
As you perform all of these exercises, you’ll get the most out of your routine by gradually reducing the tension on the strap.
Bonus: dental floss for the shoulder
Don’t forget, elastic bands can be just as reliable a warm-up and cool-down accessory. To lubricate your shoulder joints before or after a workout, try this shoulder floss exercise:
- Hold a resistance band—a mini band, tube, or therapy band—in front of you, palms down.
Tip: The more tense the shoulders, the wider the grip should be. If your shoulders are very mobile, make sure you keep the strap at least a few inches behind your shoulders.
- Slowly, in an arcing motion, bring your hands up to your ears. You should rotate at the shoulder so that the elbows are facing the ceiling.
- Evenly lower your hands past your hips to the floor. Your elbow creases should now be facing outwards.
- After a pause, slowly move your arms in this arc and return to the starting position.
If you floss your shoulders for relaxation, try synchronizing your breathing with your movements (inhale as you raise your arms up, exhale as you lower your arms down) for added relaxation.
Find irresistible workout support at Chuze Fitness
There’s no shortage of equipment and amenities to try with a Chuze Fitness membership. From top-of-the-line machines to experienced staff who will show you how to use them, Chuze gives you all the tools you need to make your fitness dreams come true.
Plus, there’s minimal resistance to taking the first step toward achieving your health goals: try a free 7-day pass to glimpse what a better future looks like.
Sources:
Prevention. How to Use Resistance Bands Correctly: A Beginner’s Guide. https://www.prevention.com/fitness/workouts/a60653919/how-to-use-resistance-bands/
Fits very well. How to use resistance band training to increase strength and muscular endurance.
https://www.verywellfit.com/how-to-use-resistance-bands-8426367
Good + Good. Neck in knots? “Shoulder flossing” is a surefire way to relax. https://www.wellandgood.com/shoulder-flossing/
 Reviewed by:
Ani is the Vice President of Fitness at Chuze Fitness and oversees the Group Fitness and Team Training departments. She has over 25 years of experience in club management, personal training, group exercise and instructor training. Ani lives with her husband and son in San Diego, California and enjoys hot yoga, snowboarding, and all things wellness.
2024-08-27 03:16:04
https://chuzefitness.com/wp-content/uploads/Resistance-bands-2.jpg